Micro-ROS Power and Distance Sensors Demo
This demo illustrates the micro-ROS capabilities and showcases the integration of micro-ROS with ROS 2 tools. Besides, it enables the comparison of micro-ROS and ROS 2 outcomes.
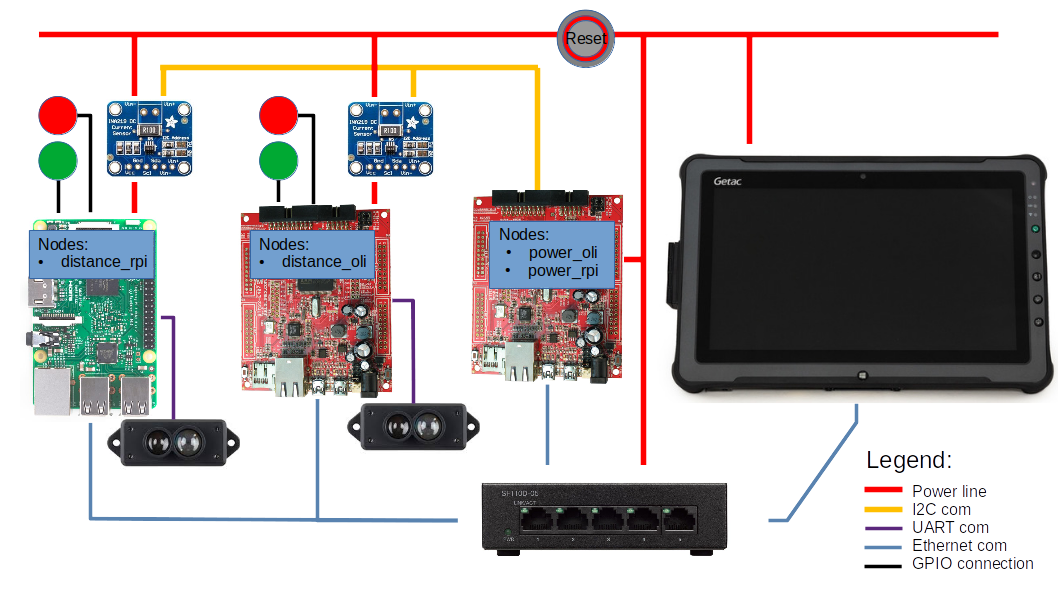
The use-case consists in a ROS2-controlled Raspberry Pi 4 with a TFMini sensor that measures the distance to a target object and a micro-ROS-controlled Olimex STM32-E407 board with the similar TFMini sensor, which measures the distance to the same object. The demo explores another micro-ROS-controlled Olimex STM32-E407 board, which measures the power consumption of both Raspberry Pi 4 and Olimex STM32-E407 boards for distance measurements, using INA219 sensors. The last component, a tablet display, visualizes measurement results using standard ROS 2 tools (rqt).
Raspberry Pi 4 is running Linux and a ROS 2 application, while Olimex STM32-E407 boards are running NuttX and micro-ROS applications.Both of them are publishing sensor messages via UDP over Ethernet LAN sending distance and power data to the display. The tablet is running Linux, ROS 2 and a micro-ROS agent to receive these messages.
Contens
- Demo Box diagram
- Topics
- Hardware
- Sensor wiring
- Ethernet connection
- How to build the micro-ROS demo system on Olimex STM32-E407
- How to build the ROS 2 demo system on a tablet
- How to build the ROS 2 demo system on Raspberry Pi 4
- Running the demo
Demo Box diagram
Topics
In this demo there are two different micro-ROS nodes and the ROS 2 node which publish the following topics:
- /distance_oli: distance measured by a sensor on the Olimex-E407 board,
- /power_oli: power consumtion of the distance Olimex board,
- /power_rpi: power consumtion of the Raspberry Pi,
- /distance_rpi: distance measured by a sensor on the Raspberry Pi.
From these topics subscribes a ROS 2 node on the tablet.
Hardware
The following is a list of the demo hardware:
- 1 x Raspberry Pi 4 + Power Supply + SD Card,
- 2 x Olimex STM32-E407 + Power Supply + Ethernet cable,
- 2 x TFMini Micro LiDAR Module,
- 2 x INA219 DC Current Sensor + shunt resistor,
- 1 x NETGEAR proSafe Gigabit Switch GS105 + Power Supply,
- 1 x Getac 2 Tablet + Power Supply + Ethernet cable,
- 1 x PC + ST-LINK/V2 to flash firmware to Olimex boards.
Sensor wiring
| TFMini | Olimex STM-E407 | |
|---|---|---|
| red | <—–> | 5V |
| black | <—–> | GND |
| white | <—–> | Tx3 |
| green | <—–> | Rx3 |
| TFMini | RPI / Pin Number | |
|---|---|---|
| red | <—–> | 5V/2 |
| black | <—–> | GNGND/6 |
| white | <—–> | Tx/8 |
| green | <—–> | Rx/10 |
| INA219 | Olimex STM-E407 | |
|---|---|---|
| SCL | <—–> | I2C1_SCL (UEXT pin 5) |
| SDA | <—–> | I2C1_SDA (UEXT pin 6) |
| Load | INA219 Address | Shunt Resistor [ohm] |
|---|---|---|
| RPI | A0=GND, A1=GND | 0.5 |
| Olimex | A0=GND, A1=Vs | 1 |
Ethernet connection
IP addresses:
- Tablet: 192.168.10.2
- RPI: 192.168.10.4
- Distance Olimex: 192.168.10.17
- Power Olimex: 192.168.10.18
How to build the micro-ROS demo system on Olimex STM32-E407
The environment for setting up the Demo Box applications will be perform within a docker:
- Download the micro-ROS base Foxy image from the Docker Hub, then run a docker container
sudo docker pull microros/base:foxy
sudo docker run -it --net=host --privileged -v /dev/bus/usb:/dev/bus/usb     microros/base:foxy
- Create a ROS 2 workspace in the uros_ws folder of the docker container and build the package
source /opt/ros/$ROS_DISTRO/setup.bash
git clone -b $ROS_DISTRO https://github.com/micro-ROS/micro_ros_setup.git src/micro_ros_setup
apt update && rosdep update
rosdep install --from-path src --ignore-src -y
apt-get install python3-pip
apt-get -y install python3-pip
colcon build
source install/local_setup.bas
- Create the Nuttx firmware on Olimex-E407 with the Demo Box sensor applications
ros2 run micro_ros_setup create_firmware_ws.sh nuttx olimex-stm32-e407
cd firmware/NuttX
git checkout -t origin/foxy
cd ../apps
git checkout -t origin/master
cd ..
Build an flash the firmware:
- Set the configuration profile variable to select the demo distance or demo power application
CFG_PROFILE=demo_distance_romfs
- Build the application
ros2 run micro_ros_setup configure_firmware.sh $CFG_PROFILE
cp firmware/NuttX/configs/olimex-stm32-e407/$CFG_PROFILE/rcS.template firmware/apps/nshlib/rcS.template
cd firmware/apps/nshlib/
../../NuttX/tools/mkromfsimg.sh -nofat ../../NuttX/
cd /uros_ws/
ros2 run micro_ros_setup build_firmware.sh
- Connect ST-Link/V2 to Olimex STM32-E407 JTAG interface and flash the firmware
ros2 run micro_ros_setup flash_firmware.sh
- Repeat the procedure Build the application with the Olimex used for monitoring the current consumption but before, the configuration needs to be changed as follow:
CFG_PROFILE=demo_power_romfs
How to build the ROS 2 demo system on a tablet
Use a tablet with Ubuntu 20.04 LTS (Focal Fossa) installation:
- Install the ROS 2 Desktop system
sudo apt update && sudo apt install locales
sudo locale-gen en_US en_US.UTF-8
sudo update-locale LC_ALL=en_US.UTF-8 LANG=en_US.UTF-8
export LANG=en_US.UTF-8
sudo apt update && sudo apt install curl gnupg2 lsb-release
curl -s https://raw.githubusercontent.com/ros/rosdistro/master/ros.asc | sudo apt-key add -
sudo sh -c 'echo "deb [arch=$(dpkg --print-architecture)] http://packages.ros.org/ros2/ubuntu $(lsb_release -cs) main" > /etc/apt/sources.list.d/ros2-latest.list'
sudo apt update && sudo apt install ros-foxy-desktop
source /opt/ros/foxy/setup.bash
sudo apt install -y python3-pip
pip3 install -U argcomplete
sudo apt install python3-colcon-common-extensions
- Install a micro_ROS agent
mkdir ~/microros_ws && cd ~/microros_ws
git clone -b $ROS_DISTRO https://github.com/micro-ROS/micro_ros_setup.git src/micro_ros_setup
sudo apt update && rosdep update
rosdep install --from-path src --ignore-src -y
colcon build
source install/local_setup.bash
ros2 run micro_ros_setup create_agent_ws.sh
ros2 run micro_ros_setup build_agent.sh
- Install ROS 2 Demo Box packeges
cd ~/
git clone ssh://git@10.0.9.18:6822/amalki/demo_suitcase.git
cd ~/demo_suitcase/
colcon build
- Configure the static Ethernet address
IPv4 address: 192.168.10.2
netmask 255.255.255.0
How to build the ROS 2 demo system on Raspberry Pi 4
-
Power on Raspberry Pi, obtain a console using ssh and install the ROS 2 Foxy system as following
sudo locale-gen en_US en_US.UTF-8
sudo update-locale LC_ALL=en_US.UTF-8 LANG=en_US.UTF-8
export LANG=en_US.UTF-8
sudo apt update && sudo apt install curl gnupg2 lsb-release
curl -s https://raw.githubusercontent.com/ros/rosdistro/master/ros.asc | sudo apt-key add -
sudo sh -c 'echo "deb [arch=$(dpkg --print-architecture)] http://packages.ros.org/ros2/ubuntu $(lsb_release -cs) main" > /etc/apt/sources.list.d/ros2-latest.list'
sudo apt update
sudo apt install ros-foxy-ros-base
sudo apt install python3-colcon-common-extensions
- Install ROS 2 Demo Box packages
cd ~/
git clone ssh://git@10.0.9.18:6822/amalki/demo_suitcase.git
cd ~/demo_suitcase/
colcon build
- Configure the static eth0 address assingment in the /etc/netplan/50-cloud-init.yaml file
network:
    ethernets:
        eth0:
            dhcp4: no
            dhcp6: no
            addresses: [192.168.10.4/24]
            gateway4: 192.168.10.1

    version: 2
- Switch off the serial console by adjusting the /boot/firmware/cmdline.txt file
net.ifnames=0 dwc_otg.lpm_enable=0 root=LABEL=writable rootfstype=ext4 elevator=deadline rootwait fixrtc
- Boot the Raspberry Pi and abort the boot process through pressing a key on a serial terminal and set the bootdelay variable to -2
U-Boot> setenv bootdelay -2
U-Boot> saveenv
- Put the startup_rpi.sh script into a boot up sequence to run the demo application on a Rasberry Pi start up
Running the demo
Connect the devices via an Ethernet switch and power them on, then run the command on the tablet
~/demo_suitcase/startup.sh
After some time two rqt windows should appear with sensors data histograms.

License
This repository is open-sourced under the Apache-2.0 license. See the LICENSE file for details.
For a list of other open-source components included in this repository, see the file 3rd-party-licenses.txt
Known Issues/Limitations
There are no known limitations.